Custom Cover Calculator + Photoshop Tutorial
 Corwin
Posts: 549
Okay here is an Microsoft Excel File that I created to help me with my Custom Covers.
I use Herring and Robinson for my binds and they give you the exact measurements needed for your custom cover.
This Calculator does all the math for you when you're ready to start your template. Plug in your dimensions and it'll tell you these important things:
*Overall length and width (with full bleed)
*top, bottom, left and right margins for full bleed
*margins for spine, front and back cover
*Length and width of actual cover (without full bleed)
*both fraction and decmial units
All that will help you set up your document so all that's left for you to do is design away!
You'll also note there is a second tab for dust jackets.
I've had a few PM's asking about getting started in Photoshop. Here is a quick tutorial of how to get started.
Steps after using Custom Cover Calculator (colors coincide with calculator):
*File > New: input Total Dimensions Height and Width in light blue (in inches) [You want your resolution to be at least 150...I use 300] Color Mode: CMYK the rest can all be default
*View > New Guide: Position Horizontal then input your Top and Bottom Margins in red
*View > New Guide: Position Vertical then your Center number [this gives you a line right in the middle of your document, not really needed but I like having it]
*Now repeat Vertical Positions for Spine Left, Spine Right, Left Margin, Right Margin (in green) and you're set up.
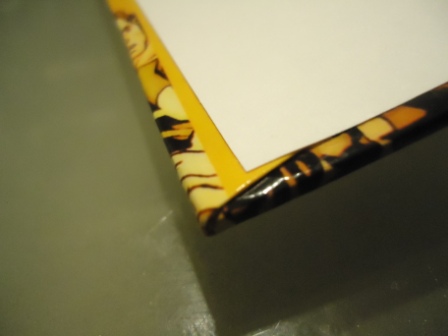
When you're done you should be able to clearly see your cover. Just remember that your images must stretch to completely fill the document. Your images have to past all the margins! The images in the full bleed with be seen as edges and on the inside of your bind...let me get a pic...

If anyone else wants to post a tutorial on setting up a document in other programs please do. I want to re-post the tutorial on Comic Binding so if you don't want me to copy it over there please PM me.
Hope that helps!
I use Herring and Robinson for my binds and they give you the exact measurements needed for your custom cover.
This Calculator does all the math for you when you're ready to start your template. Plug in your dimensions and it'll tell you these important things:
*Overall length and width (with full bleed)
*top, bottom, left and right margins for full bleed
*margins for spine, front and back cover
*Length and width of actual cover (without full bleed)
*both fraction and decmial units
All that will help you set up your document so all that's left for you to do is design away!
You'll also note there is a second tab for dust jackets.
I've had a few PM's asking about getting started in Photoshop. Here is a quick tutorial of how to get started.
Steps after using Custom Cover Calculator (colors coincide with calculator):
*File > New: input Total Dimensions Height and Width in light blue (in inches) [You want your resolution to be at least 150...I use 300] Color Mode: CMYK the rest can all be default
*View > New Guide: Position Horizontal then input your Top and Bottom Margins in red
*View > New Guide: Position Vertical then your Center number [this gives you a line right in the middle of your document, not really needed but I like having it]
*Now repeat Vertical Positions for Spine Left, Spine Right, Left Margin, Right Margin (in green) and you're set up.
When you're done you should be able to clearly see your cover. Just remember that your images must stretch to completely fill the document. Your images have to past all the margins! The images in the full bleed with be seen as edges and on the inside of your bind...let me get a pic...

If anyone else wants to post a tutorial on setting up a document in other programs please do. I want to re-post the tutorial on Comic Binding so if you don't want me to copy it over there please PM me.
Hope that helps!
